A living library of plants, workshop with students of ESA St-Luc
[TOC]
Concept
Inspiration
From electro-culture to recent touché experiments, using electricity to connect and foster our relationship with plants are numerous.

Here we continue this tradition, as a way to make sense of the technology we have, and as an excuse to spend time with plants.
Déroulement
The workshop a living library of plants is to link texts, trees and human through the use of the ESP32 microcontroller.
The idea is to create a small wifi access point, tied to a plant, that will publish different text depending on its electrical activity and the moisture of its soil.
Set-up (30 minutes- keep faith)
Necessary elements
In order to participate to this workshop you will need:
an esp32 microcontroller: for this workshop we used the one proposed by AZdelivery
a microUSB cable
a soil moisture sensor with Dupont cables
a crocodile cable/ alligator clip
Installing the Arduino IDE
For this workshop we will use the arduino IDE. It is an open-source, easy to use IDE (Integrated Development Environment ) to upload code to a microcontroller. It was developped for a range of microcontroller also named arduino (which is why it can be confusing).
To install it, you can follow this link and click on the download link fitted to your operating system (macOS, windows or Linux)
Installing the USB driver of the esp32
The esp32 is a microcontroller, meaning that it can perform some simple computing task such as reading a sensor, printing a message on a communication canal or performing simple operations.
The ESP32 is not a traditionnal arduino board and requires a specific driver to be installed for it to be able to communicate with your computer. A driver is a small programm that will allow the communication between your computer and another device, in other words it will make your computer recognise the esp32.
You can find the driver on this website, select the link corresponding to your operating system(macOS, Windows, Linux) and follow the isntructions.
Installing the library for esp32 on the arduino IDE 1/2
Now your computer recognise the esp32, but the arduino IDE should know which language to speak to it. In order for them two to communicate smoothly, we need to install a library for the esp32 on the arduino IDE.
-
Open the Arduino IDE. Make sure that you are at version 1.8 or higher, if not then update your IDE with the latest version.
-
Click on the File menu on the top menu bar.
-
Click on the Preferences menu item. This will open a Preferences dialog box.

-
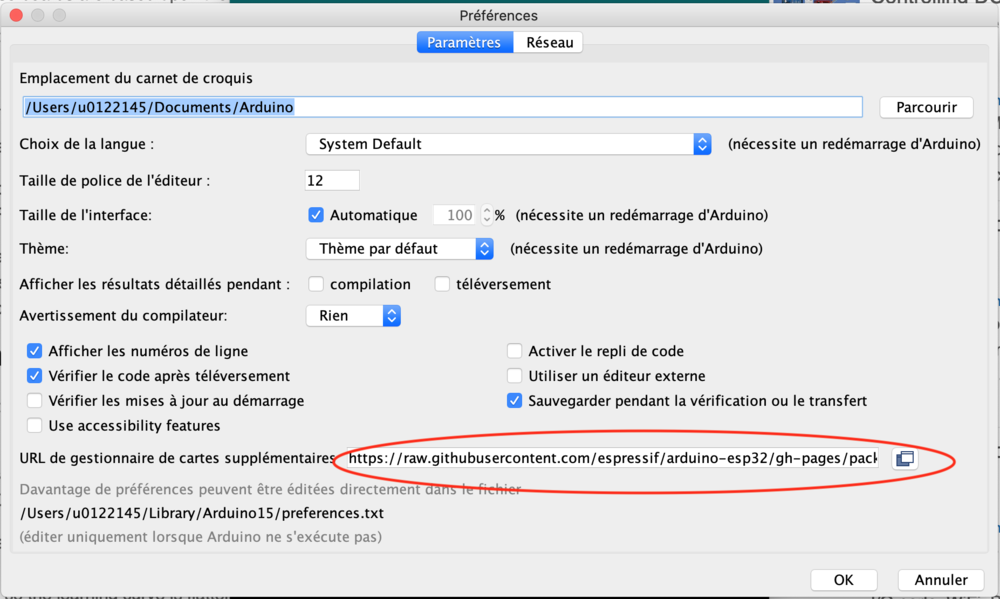
You should be on the Settings tab in the Preferences dialog box by default.
-
Look for the textbox labeled “Additional Boards Manager URLs”.
-
If there is already text in this box add a coma at the end of it, then follow the next step.
-
Paste the following link into the text box – *https://raw.githubusercontent.com/espressif/arduino-esp32/gh-pages/package_esp32_index.json*
-
Click the OK button to save the setting.
Installing the library for esp32 on the arduino IDE 2/2
Next, you will need to use the new entry to actually add the ESPO32 boards to your Arduino IDE. You do that by following this procedure:
-
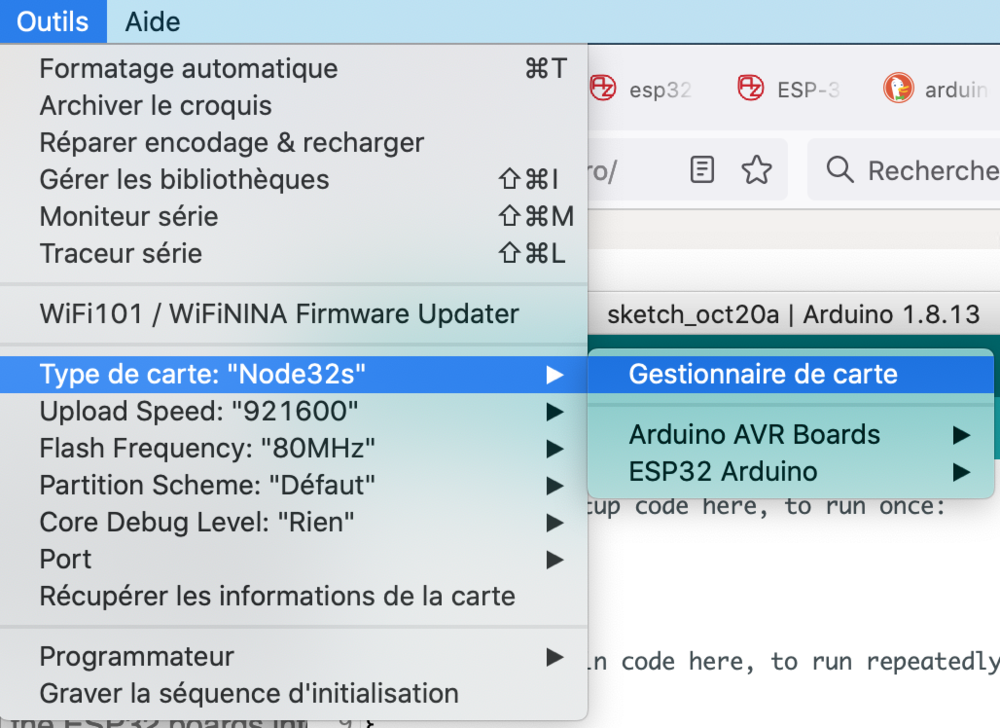
In the Arduino IDE click on the Tools menu on the top menu bar.
-
Scroll down to the Board: entry (i.e. Board: Arduino/Genuino Uno).
-
A submenu will open when you highlight the Board: entry.
-
At the top of the submenu is Boards Manager. Click on it to open the Boards Manager dialog box.
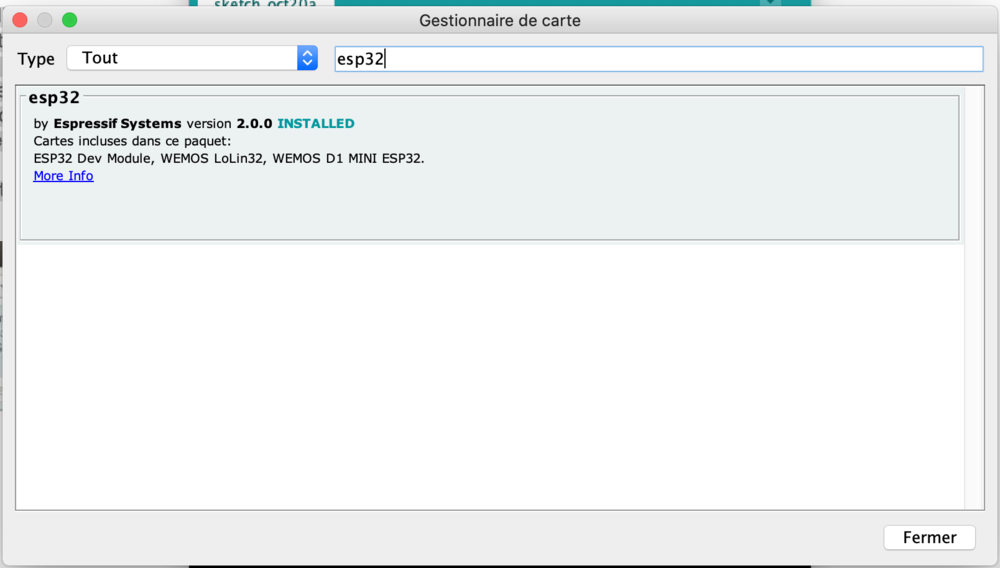
- In the search box in the Boards Manager enter “esp32”.
-
You should see an entry for “esp32 by Espressif Systems”. Highlight this entry and click on the Install button.
-
This will install the ESP32 boards into your Arduino IDE
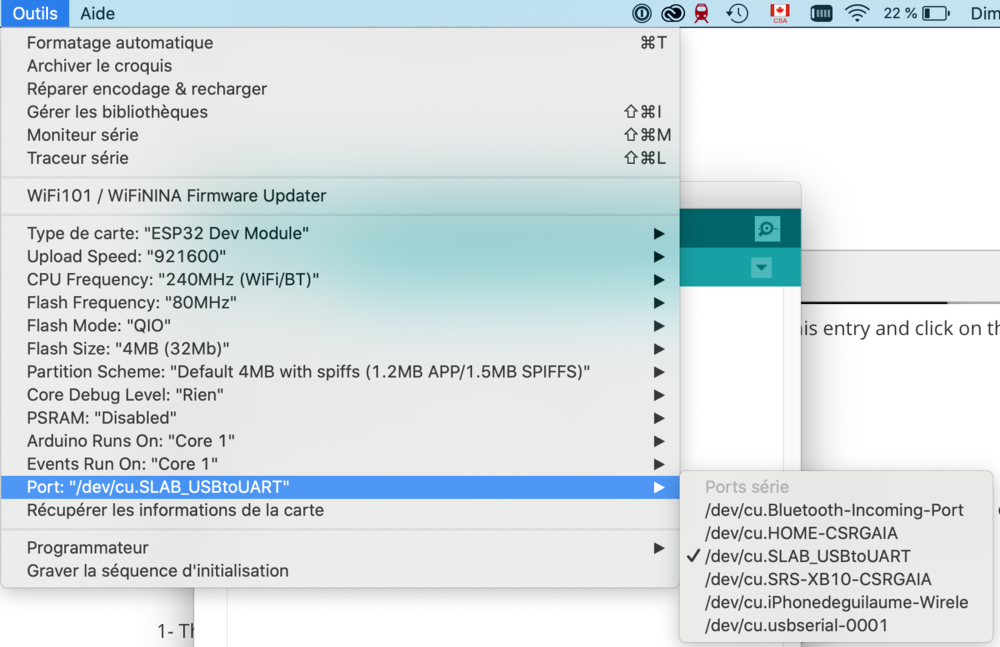
Selecting the right board and port
1 - Once your board library is installed, you can select the board in the board manager. Select either esp32 Dev Board or Node32s
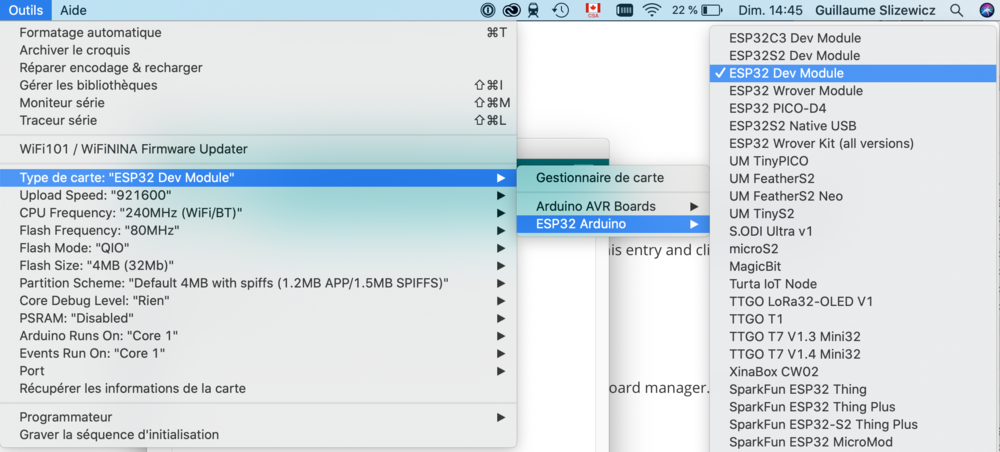
2 - Then you can select on which port it will be communicating (the USB port)
Now you are ready to create script and upload them to your microcontroller ! Well done.
Using esp-32 touch sensor with a crocodile cable
Sensing electricity
Here is the code you want to put in your arduino IDE before sending it to your esp-32
int touch_sensor_value=0;
void setup()
{
Serial.begin(115200);
Serial.println("Touch sensor - ESP32 - electric feel");
}

void loop()
{
touch_sensor_value = touchRead(T0);
Serial.print("It can feel = ");
Serial.println( touch_sensor_value);
delay(1000);
}
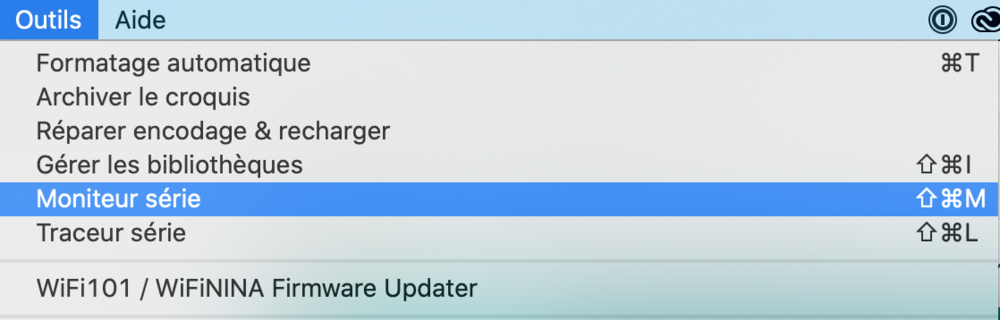
To make sure that you made no mistake you can check it first with the little checkmark button before sending it with the little arrow. In order to know wether your touch sensor and your code is running, you need to open your serial monitor. It is a tool that let you peak into the conversation between the esp32 and your computer.
In order to do this go to Tool>Serial Monitor
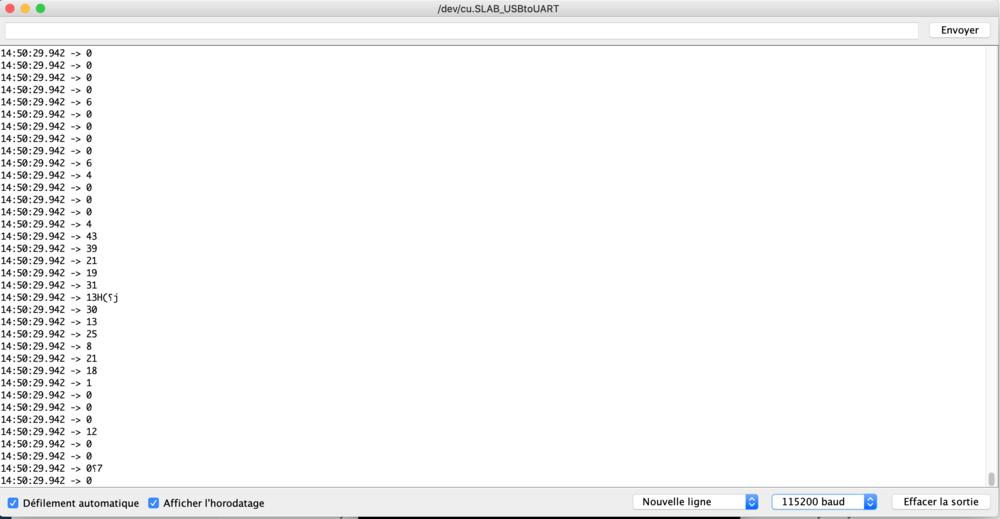
If all go well you should be able to see the values of your touch sensor.
Now if we detail this script:
1- Enummerating the actors in our process.
We first declare a variable, something that will be monitored, something that exists for the esp32, in our case the value of the sensor, how much electricity. At the beginning of the process, it is zero.
int touch_sensor_value=0;
2- Setting the stage.
void setup is a way to start the command of the esp-32, it will only be run once.
void setup()
{
In our case, we want to communicate with the esp-32 on the canal that represent the baud frequency of 115200, so in the voice setup we will open this canal.
Serial.begin(115200);
And in order to make sure that this is open, we will print, say something on it
Serial.println("Touch sensor - ESP32 - electric feel");
And then we will close this first, setup script.
}
3- Describing recurring events/command
the stage is set, so now we will describe what we want the controller to continually do. In our case, it is to check the value on the alligator clip and print it in our communication canal, the serial 115200
The loop is a way to start recurring command, that will be called again and again
void loop()
{
inside this loop command we ask the esp-32 to read the value on its sensor attached to its pin T0 and store it in the touch-sensor-value variable. How much electrical energy is there?
touch_sensor_value = touchRead(T0);
Then we print this value in the serial communication canal
Serial.print("It can feel = ");
Serial.println( touch_sensor_value);
And then we let the esp32 rest for a second before starting again from the start of the loop.
delay(1000);
}
In order to see what is being printed, we need to open the serial monitor in the Tool section and select baud rate 115200
Task:
Find your own way to ask (or not) for permission to attach the alligator clip to the plant. Do not attach the clip directly as it closes quite strongly, attache a piece of coil that you put around the trunk.
"Asking permission shows respect for the personhood of the plant, but it is also an assessment of the well-being of the population. Thus I must use both sides of my brain to listen to the answer. The analytic left reads the empirical signs to judge whether the population is large and healthy enough to sustain a harvest, whether it has enough to share. The intuitive right hemisphere is reading something else, a sense of generosity, an open-handed radiance that says take me, or sometimes a tight-lipped recalcitrance that makes me put my trowel away. I can’t explain it, but it is a kind of knowing that is for me just as compelling as a no-trespassing sign. This time, when I push my trowel deep I come up with a thick cluster of gleaming white bulbs, plump, slippery, and aromatic. I hear yes, so I make a gift from the soft old tobacco pouch in my pocket and begin to dig."
Braiding sweetgrass
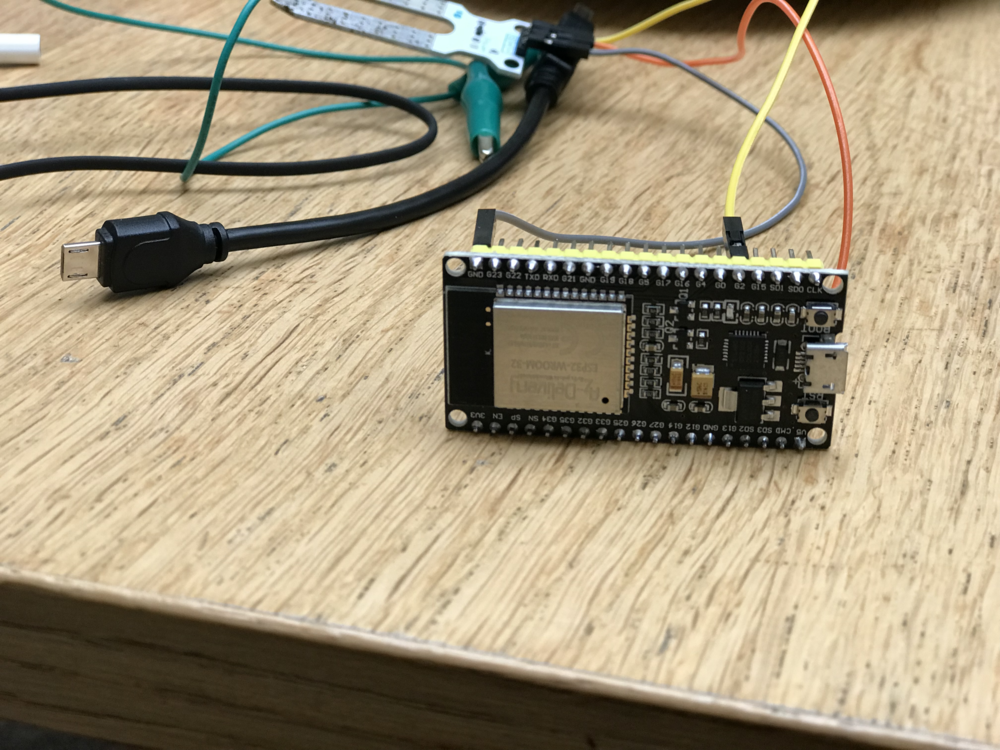
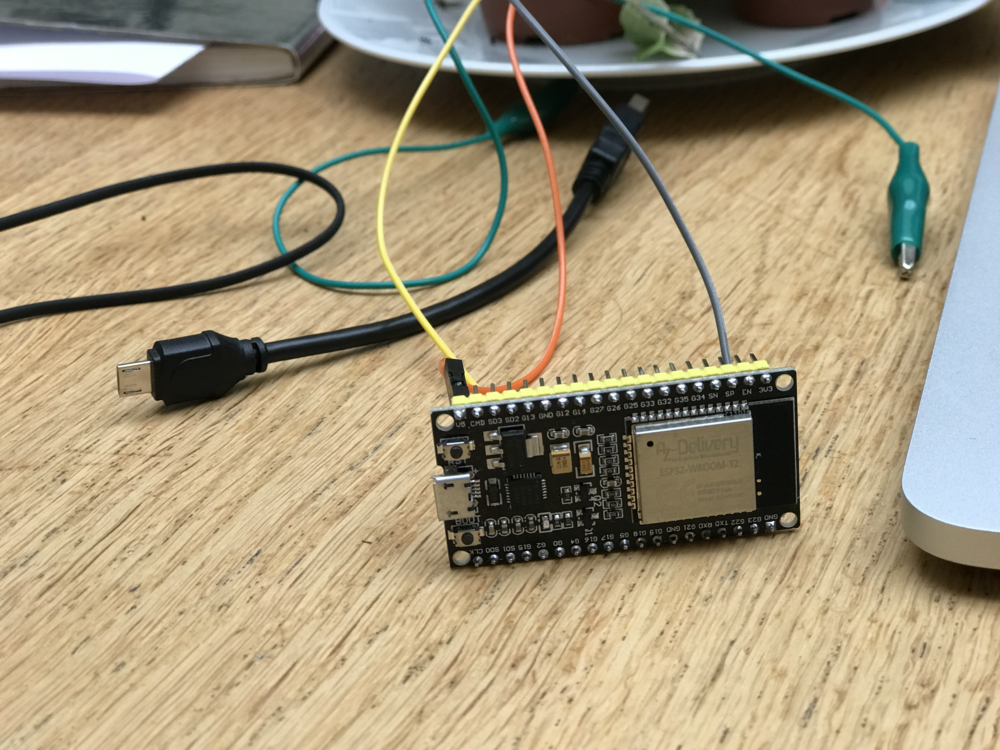
If you feel like it gave it to you, attach the clip to the plant and check the behavior when you touch the plant on a the trunk, on the leaf, near the soil.

-> as you can see the alligator clip is connected to G4 which is touch 0 (T0) on this pin-out diagram
 Making text appear whenever the sensor is touched
So now we can see the value on the alligator clip. We now want to use this information to trigger a behaviour, whenever the value drops under a certain level, we want to display a text:
int touch_sensor_value=0;
void setup()
{
Serial.begin(115200);
Serial.println("Touch sensor - ESP32 - electric feel");
}

void loop()
{
touch_sensor_value = touchRead(T0);

Serial.print("It can feel = ");
Serial.println( touch_sensor_value);

if (touch_sensor_value<40){
Serial.println("     | ");
Serial.println("   <>|<> ");
Serial.println("  <>~|~<> ");
Serial.println("<>~<>|<>~<>  ");
Serial.println("<>~<>|<>~<>  ");
Serial.println("  <>~|~<> ");
Serial.println("     |  ");
Serial.println("     |  ");
Serial.println("For each of us as women, there is a dark place within, where hidden and growing our true spirit rises");
Serial.println("\"beautiful/and tough as chestnut/stanchions against (y)our nightmare of weakness/\"** and of impotence.");
Serial.println("Audre Lorde");
Serial.println("     | ");
Serial.println("   <>|<> ");
Serial.println("  <>~|~<> ");
Serial.println("<>~<>|<>~<>  ");
Serial.println("<>~<>|<>~<>  ");
Serial.println("  <>~|~<> ");
Serial.println("     |  ");
Serial.println("     |  ");
delay(10000);
}
else {
Serial.println("    ~|~ ");
Serial.println("  ~  | ~  ");
Serial.println("  ~  |  ~    ");
Serial.println("    ~|~   ");
Serial.println("     |  ");
Serial.println("     |  ");
}
delay(1000);
}
What we do first is getting the value of the sensor:
touch_sensor_value = touchRead(T0);

Serial.print("It can feel = ");
Serial.println( touch_sensor_value);
Then we add a condition that says : if the value is inferior to 10, then print this message, if it is superior, print this other message. We do this as follows. We first open the condition
if (touch_sensor_value<40){
Then we print the message (the tree is just aesthetically pleasing)
Serial.println("For each of us as women, there is a dark place within, where hidden and growing our true spirit rises");
Serial.println("\"beautiful/and tough as chestnut/stanchions against (y)our nightmare of weakness/\"** and of impotence.");
Then we close this condition
}
And we add another statement for all other cases that do not conform to this first condition
else {
Serial.println("    ~|~ ");
[....]
}
Task
Come up with your own text and illustrative elements when the plant is touched. Code your own behaviour for the interaction.
Using esp-32 with a moisture sensor
To use the esp-32 with a moisture sensor, we do a similar exercise, with the addition of an electrical circuit for the soil moisture sensor, which needs to be electrified itself, hence we must connect it to a pin that gives it a current of 5V and a pin that gives it a ground.
Once this is done, here is the code to read the output
int SENSE= 2; // Soil Sensor input at Analog PIN A0
int value= 0;
void setup() {
Serial.begin(9600);
Serial.println("SOIL MOISTURE SENSOR");
Serial.println("-----------------------------");
}
void loop() {
value= analogRead(SENSE);
value= value/10;
Serial.println(value);
}
Creating a webserver with the esp-32
In our last task, we are gonna set-up a web server that runs autonomously on the esp-32 and that can react to the touch or the soil moisture. MAYBE WITHOUT HTML AT FIRST?
#include <WiFi.h>
#include <WebServer.h>
// SSID & Password
const char* ssid = "Plant_poem"; // Enter your SSID here
const char* password = ""; //Enter your Password here
// IP Address details
IPAddress local_ip(192, 168, 1, 1);
IPAddress gateway(192, 168, 1, 1);
IPAddress subnet(255, 255, 255, 0);
WebServer server(80); // Object of WebServer(HTTP port, 80 is default)
// HTML & CSS contents which display on web server
String HTML = "<!DOCTYPE html>\
<html>\
<body>\
<h1> 🍃 Hello There 🍃;</h1>\
</body>\
</html>";
void setup() {
  Serial.begin(115200);

  // Create SoftAP
  WiFi.softAP(ssid, password);
  WiFi.softAPConfig(local_ip, gateway, subnet);


  Serial.print("Connect to My access point: ");
  Serial.println(ssid);

  server.on("/", handle_root);

  server.begin();
  Serial.println("HTTP server started");
  delay(100);
}
void loop() {
  server.handleClient();
}
// Handle root url (/)
void handle_root() {
  server.send(200, "text/html", HTML);
}
Detailling the process
0- Calling libraries
#include <WiFi.h>
#include <WebServer.h>
This first part will include some code that is placed in another file and that will allow us to go quicker by using functions already written by other people
1- Enummerating/presenting the actors in our process.
// SSID & Password
const char* ssid = "Plant_poem"; // Enter your SSID here !to change!
const char* password = ""; //Enter your Password here !leave empty!
// IP Address details
IPAddress local_ip(192, 168, 1, 1);
IPAddress gateway(192, 168, 1, 1);
IPAddress subnet(255, 255, 255, 0);
WebServer server(80); // Object of WebServer(HTTP port, 80 is default)
// HTML & CSS contents which display on web server
String HTML = "<!DOCTYPE html>\
<html>\
<body>\
<h1> 🍃 Hello There 🍃;</h1>\
</body>\
</html>";
Here we first declare two variables, which are gonna be the name of the network of your network and its password
The second paragraph is about the adress of your network, its IP adress, to what you will connect to see your website
The third paragraph is the content of your website, here in html
2- Setting the stage.
void setup() {
Serial.begin(115200);
// Create SoftAP
WiFi.softAP(ssid, password);
WiFi.softAPConfig(local_ip, gateway, subnet);
Serial.print("Connect to My access point: ");
Serial.println(ssid);
server.on("/", handle_root);
server.begin();
Serial.println("HTTP server started");
delay(100);
}
Here we are gonna first open the communication canal for baud rate 115200
Then create our own Wi-Fi access point using the variable we declared in the previous step and let know the user by printing a statement on the communication canal
Then we will specify what happens on the "/" adress of our server. Here we call another function called handle_root . the behavior of this function will be explained in the next step.
Then activate our server and let it know through the communication canal
3- Describing recurring events/command
void loop() {
server.handleClient();
}
Here we ask the controller to handle the client (your browser) so it can access the server.
4- special function - handle root
// Handle root url (/)
void handle_root() {
server.send(200, "text/html", HTML);
}
This function details what is happening when someones connect to 192.168.1.1 without any character after this (the root address)
How to add touch sensor to this code?
In order to add a sensor to the code we must:
1- introduce its name
2- make the script check for its value chronically
3- use this always updated value in a if statement
How would that look? Can you point out the steps in the code below?
#include <WiFi.h>
#include <WebServer.h>
// SSID & Password
const char* ssid = "Plant_poem"; // Enter your SSID here
const char* password = ""; //Enter your Password here
int touch_sensor_value=0;
// IP Address details
IPAddress local_ip(192, 168, 1, 1);
IPAddress gateway(192, 168, 1, 1);
IPAddress subnet(255, 255, 255, 0);
WebServer server(80); // Object of WebServer(HTTP port, 80 is default)
// HTML & CSS contents which display on web server
String HTML = "<!DOCTYPE html>\
<html>\
<body>\
<h1> 🍃 we learn to bear the intimacy of scrutiny and to flourish within it 🍃;</h1>\
</body>\
</html>";
void setup() {
Serial.begin(115200);
// Create SoftAP
WiFi.softAP(ssid, password);
WiFi.softAPConfig(local_ip, gateway, subnet);
Serial.print("Connect to My access point: ");
Serial.println(ssid);
server.on("/", handle_root);
server.begin();
Serial.println("HTTP server started");
delay(100);
}
// Handle root url (/)
void handle_root() {
if (touch_sensor_value<40){
server.send(200, "text/html", HTML);
}
else {
Serial.println("Nothing to print here ~|~ ");
}
}
void loop() {
server.handleClient();
touch_sensor_value = touchRead(T0);
Serial.print("It can feel = ");
Serial.println( touch_sensor_value);
}
Task
How would you do the same with the soil moisture sensor? How can you combine the two?
Technical links
Espressif documentation on esp-32
How to use esp-32 as a touch sensor
esp-32 wifi communication with arduino IDE
creating a webserver with esp-32
Misc links
On mineral necessary for electronics
the secret life of plants - controversial documentary sometimes dubbed as pseudo-science - for inspiration
wikipedia on the secret life of plants
Supply chain analysis for minerals needed for electronics
Chaine d'approvisionnement de plusieurs matériaux d'un ordinateur
Francis Hallé on specific trees
Music
Soichi Terada - Bamboo fighter